
The Basics of Home Sewing: the Sewing Pattern, Part 2
Cutting markings, layout lines, construction markings…
Let’s start with a few definitions to make sure you understand where to put your pattern pieces, on which fabric and what markings you should look for. This post is an overview on the general concepts along with my insights – you can find further details in many good sewing books.
Figure 1 depicts a single layer of fabric and the terms that one needs to understand to lay the pattern pieces correctly.
- Selvage: Selvedge or selvage depending where you are from is a "self-finished" edge of a woven fabric that is finished in a way that keeps the fabric from unraveling. Normally, the selvage fabric is not used in the construction of a garment, but you can definitely be creative and use it.
- Lengthwise and crosswise grains: in a woven fabric, threads run horizontally and vertically throughout the fabric. These lengthwise and crosswise threads are supposed to form right angles to one another forming a “straight grain”. If the grain is not straight, you may end up with a garment that doesn't fall quite right.
- Bias: the bias on a woven fabric is the diagonal direction of fabric. True bias is at 45 degrees from the grainlines. A woven fabric with no stretch lengthwise or crosswise will have some stretch on the bias.
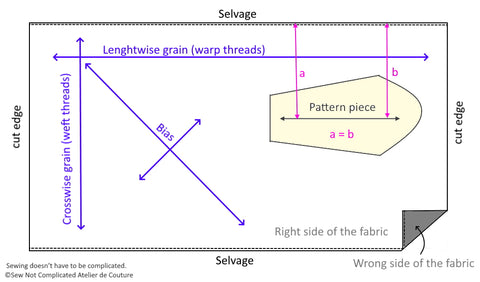
Figure 1. Grainlines, Bias and Selvage
Cutting the fabric is a very important part of a sewing project, but you must first lay your pattern pieces correctly and on the right fabric. Make sure you cut your pattern pieces as precisely as possible to ensure that the assembly goes smoothly. This is the part that I enjoy the least about sewing, it makes me nervous especially when it is a very nice fabric. My only advice is to take it slow and check a few times before cutting.
"Cut one on fold", "cut 2 main fabric", "cut 1 from self", etc. are all cutting instructions. It tells you how many of each pattern pieces the garment will require, from which fabric and it also indicates how the pattern piece should lay on your fabric. Figure 2 shows an example of a cutting layout for a fabric that has a 58 in. (inches) width. The grainline arrow on the pattern piece should always be parallel to the selvage when placing the pattern pieces on the fabric (see Figure 1 where "a" has to be equal to "b" - yes, take a measuring tape and measure it!).
"Cut one on fold" means you will need one piece of fabric cut according to a half pattern piece. You do not cut along the fold. The pattern piece should align with the fold of the fabric. When cut and unfolded, you will get a piece of fabric that is double the size of the pattern template.
Also note which side of the pattern should be up (facing you). Sometime, you need to flip the pattern before laying it on your fabric.

Figure 2. Cutting Layout Example
- Main fabric or self: refers to the fabric used for your garment or the fabric you will see on the outside of the finished garment.
- Wrong side of the fabric: side of the fabric on inside of garment.
- Right side of the fabric: side of the fabric on outside of garment.
- Lining: the fabric used inside a garment.
- Interfacing: extra layer used to stabilize the fabric. Frequently used for collars, button plackets, pockets opening, etc.
- Fabric with nap: fabric with fibers that lie smoothly in one direction. For example, velour has a nap. All the pattern pieces should be laid out in the same direction so that the nap of the finished garment will run in the same direction.
- Fabric with directional print: similar to a fabric with a nap, you want to orient all your pattern pieces so that the print of the finished garment will run in the same direction.
Refer to your pattern legend to check the color used to represent each type of fabric to be used and whether it is on the right or wrong side. The right and wrong side can be very similar for some fabric, try to pick one as your right side and keep it consistent throughout your project. Some fabric can be pretty on either side, you pick the side you prefer as the right side.
Most patterns will provide a suggested cutting layout based on the width of fabric used. You can start by following these guidelines. I find that these are not the best to minimize fabric wastes, but they usually ensure that all the pattern pieces will fit the suggested amount of fabric. When you get more experience, you can play around with the layout to reduce fabric consumption. Most patterns will have half pattern templates, meaning that you will cut on the fold. If you want to take the time to trace a full template piece to put it on a single layer of fabric, you may find that the fabric consumption will be reduced. Figure 3 below shows an example of a sleeve cut on a double layer versus on a single layer.

Figure 3. Pattern Layout on a Single or Double Layer of Fabric
Each pattern piece will also have various markings that will help you construct your garment. Figure 4 shows common marking that you may find on patterns, including, grainlines, notches, darts, seam allowances and other markings.
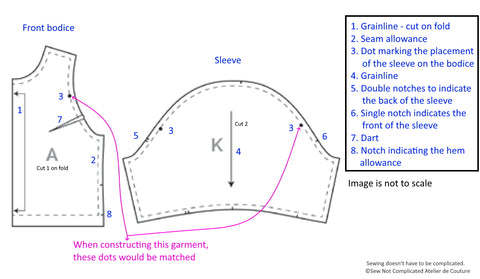
Figure 4. Pattern Markings Examples
- Grainline or straight of grain: usually indicated by a two headed arrow or single head arrow. This should be aligned with the selvage of your fabric.
- Notches: notches are little marks on the pattern pieces that are made to ensure that one pattern piece will match up to the pattern next to it so that when you sew your pieces of fabric they will be joined at the right place. Some notches can also indicate a seam allowance. Usually, two notches grouped together indicate a pattern piece for the back of the garment whereas only one notch indicates a front piece of the garment. Depending on the patternmaker, the notches may be little lines or triangles. Patterns usually show a legend for each symbol used.
- Seam allowance: Seam allowances refer to the area between the stitching and raw, cut edge of the fabric. Don’t assume that all seam allowances are the same. They can vary from pattern to pattern and also be different for different parts of the same garment. They usually range from ¼ in. (6mm), common for pattern for knits, to 5/8 in. (15 mm). Each pattern will indicate what seam allowance is included if they are included. All patterns available in the shop include seam allowances and indicate clearly what it is.
- Darts: to allow shaping of the garment. They are not always straight, many designs require curved darts.
- Other markings (dots and squares): may indicate pocket placement, placement for overlapping pieces, suggested buttonhole placement, etc.
- Center front and center back lines: indicates where garment is to fall at the center of the body.
- Adjustment lines: usually for lengthening or shortening. These adjustments are done before cutting if required depending on your own measurement in comparison to the base model the patternmaker used to draft the pattern (pattern block).
All the notches and markings should be transferred to the fabric to help with the construction. Notches can be marked using little snips in the seam allowance (not going through the seam allowance) or could be cut beyond the pattern pieces. A pattern "notcher" is a handy tool that allows you to cut notches quickly but is totally optional, you can use the tip of your scissors, but just make sure you cut only within the seam allowance.
For markings inside the pattern piece, tailor chalk or other marking tools can be used. Disappearing ink pen works great, but like the name implies, the ink disappears after a while. Washable Crayola markers are a good option for marking too. Depending on your type of fabric and it’s colour, one marking tool may work better over another. You may want to test your marking tool on a swatch of your fabric beforehand in case it doesn’t wash away completely. An awl can also be used to make little holes in your fabric at the marking’s location. Small stickers may also work. A classic method for markings is tailor’s tacks using a needle and thread. Since I tend to take my time to complete a project, some markings may be erased before I get to sewing whereas tailor's tacks will stay there if manipulated carefully. You can see an overview of the marking tools and techniques in this short video:
Enough for today…next time, I will talk about fabrics or maybe sewing machines...so many things to talk about! 🙂